How to add a man page to your Ruby project
— kramdown, kramdown-man, man-page, markdown, ruby
If you have ever used the git command-line utility, you will be pleasantly
surprised that if you run git clone --help it automatically displays the man
page for git clone instead of the usual --help output.
This blog post will show you how to add the same functionality to your Ruby command-line utility.
Introducing kramdown-man
Man pages are written in the roff typesetting markup language, which
uses macro tags that look like .PP and \fB. Needless to say writing roff
by hand is not fun. Instead, we will use the kramdown-man gem to generate
the roff man page from a similar looking pure markdown man page.
Step 1: Add kramdown-man
Add kramdown-man to your Gemfile and run bundle install:
gem 'kramdown-man', '~> 1.0'
Step 2: Write the markdown man page
First create the man/ directory in your project.
$ mkdir man
Then write the markdown man page, which should be named like man/mycli.1.md.
The number in the file name indicates the man page Section number
(Section 1 is for General Commands, Section 3 is for Library Functions).
Use kramdown-man’s own man page as an example for how to structure your markdown man page. It should look roughly like this:
# mycli 1 "2024-01-01" MyCLI "User Manuals"

## NAME

mycli - Does things and stuff

## SYNOPSIS

`mycli` [*options*] *ARG1* [*ARG2*]

## DESCRIPTION

The `mycli` utility does things and stuff. Bla bla bla bla.

## ARGUMENTS

*ARG1*
: This is a required argument.

*ARG2*
: This is an optional argument

## OPTIONS

`-f`, `--flag` *VALUE*
: This is an option flag that takes a *VALUE* argument.

`-h`, `--help`
: Prints the help information for the command.

## EXAMPLES

Example command description:

    $ mycli --flag file.txt

## AUTHOR

Your Name <you@example.com>

## SEE ALSO

[bash(1)](man:bash.1) [other-man-page](other-man-page.1.md)
To preview how the markdown man page will be rendered, use the kramdown-man
command:
$ kramdown-man man/mycli.1.md
Markdown Man Page Layout Explained
Header
The first line will be used for the man page’s header and footer lines. It has the following format:
# mycli 1 "2024-01-01" MyCLI "User Manuals"
# mycli- The command name.1- The section number.2024-01-01- The date the man page is being written, in the formatYYYY-MM-DD.MyCLI- The project’s name."User Manuals"- The man page section name.
Sections
Man pages typically have the follow main sections:
NAME- The command name and a short definition.SYNOPSIS- The command’s usage, showing order of arguments.DESCRIPTION- A more detailed description of the command.ARGUMENTS- Defines the purpose of each argument.OPTIONS- Defines the purpose of each option flag and it’s usage.EXAMPLES- Show common examples of running the command.AUTHORS- List the authors of the command.SEE ALSO- Link to other man pages.
ARGUMENT / OPTION LISTS
Argument and option definitions must be defined using
markdown definition lists (hence the : before the summary) for them to be
properly indented.
*ARG1*
: Definition goes here.

*ARG2*
: Definition goes here.

  Multiple paragraphs may be given.
COMMAND USAGE SYNTAX
Codespans indicate a literal word:
`mycli`
Emphasis and all uppercase indicates a required argument:
*ARG*
Square brackets around an argument indicates an optional argument.
[*ARG*]
Curly-braces with pipe separates indicates one of the arguments is required:
{*ARG1* \| *ARG2* \| *ARG3*}
Man Page Links
To link to other man pages in your project’s man/ directory, use a regular
markdown link that links to the .1.md file:
[other-man-page](other-man-page.1.md)
This will also generate a bolded man page reference which will look like other-man-page(1) in the displayed man page.
To link to other man pages that are already installed on a system, use a
regular markdown link, but use a man:page-name.1 URL with the man page
name and section number:
[bash(1)](man:bash.1)
This will generate a bolded man page reference which will look like bash(1) in the displayed man page.
Note: Firefox on Linux will actually recognize man: URIs and open them
using Gnome’s yelp help browser.
Step 3: Add the rake task
Now that we have written the markdown man page, we need to setup a rake task to generate the roff formatted man page from the markdown man page.
Add the following code to your Rakefile:
require 'kramdown/man/task'
Kramdown::Man::Task.new
This will define a man rake task and define file dependencies between the
man/*.1 output files and the man/*.1.md input files.
Step 4: Generate the man pages
To generate all man pages in the man/ directory run:
$ rake man
You can then view the generated man pages using the man command:
man ./man/mycli.1
Step 5: Add the code
In order for our CLI to automatically display the man page when the --help
option is given, we will need to add this bit of code to the OptionParser’s
--help option:
# The path to the man/mycli.1 generated man page
MAN_PAGE = File.join(__dir__,'..','..','..','man','mycli.1')

...

opts.on('-h','--help','Prints this kruft') do
  if $stdout.tty?
    system('man',MAN_PAGE)
  else
    puts opts
  end
  exit
end
The if $stdout.tty? check tests whether stdout is a TTY or being redirected
to a file or another command. If we are running in a real TTY terminal, then
display the man page. If we are not running in a real TTY terminal, then
print the usual --help output. This is a polite thing to do, as users might
want to view the --help output through less or might dump it to a file using
--help >mycli.txt.
If you don’t want to copy/paste the above code into all of your Ruby projects, you can use the command_kit gem, which provides a CommandKit::Help::Man module that adds the same functionality to a command class.
Step 6: Package your man page
Now that we have generated our roff man pages, we will want to add them to either git or the gemspec’s files list. This way the generated roff man page will be included in the packaged gem.
If you prefer to not add the generated roff man page to git, you can manually
add it to the list of files in your .gemspec file:
gem.files << 'man/mycli.1'
Then build and install your gem:
$ rake gem
$ gem install ./pkg/mycli-0.1.0.gem
Step 7: Test It!
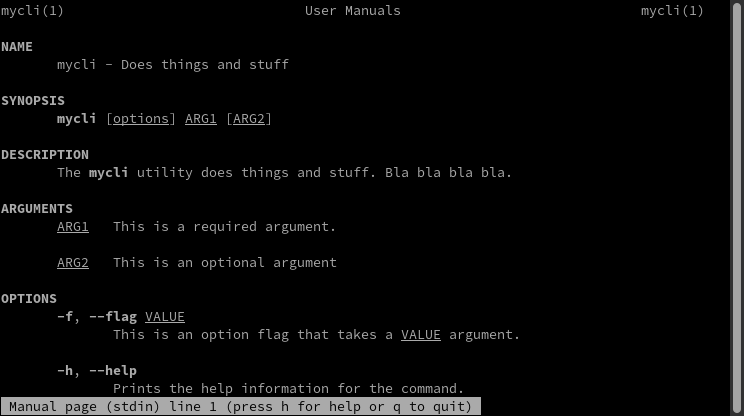
Now your command should display it’s own man page when --help is given:
$ mycli --help
You should see something that looks like this: